
Building automations
An automation does something by itself when something happens. For example: when an order comes in from the Netherlands, send a Peppol invoice. You build an automation from blocks that click together. You find them under Planning → Automation.
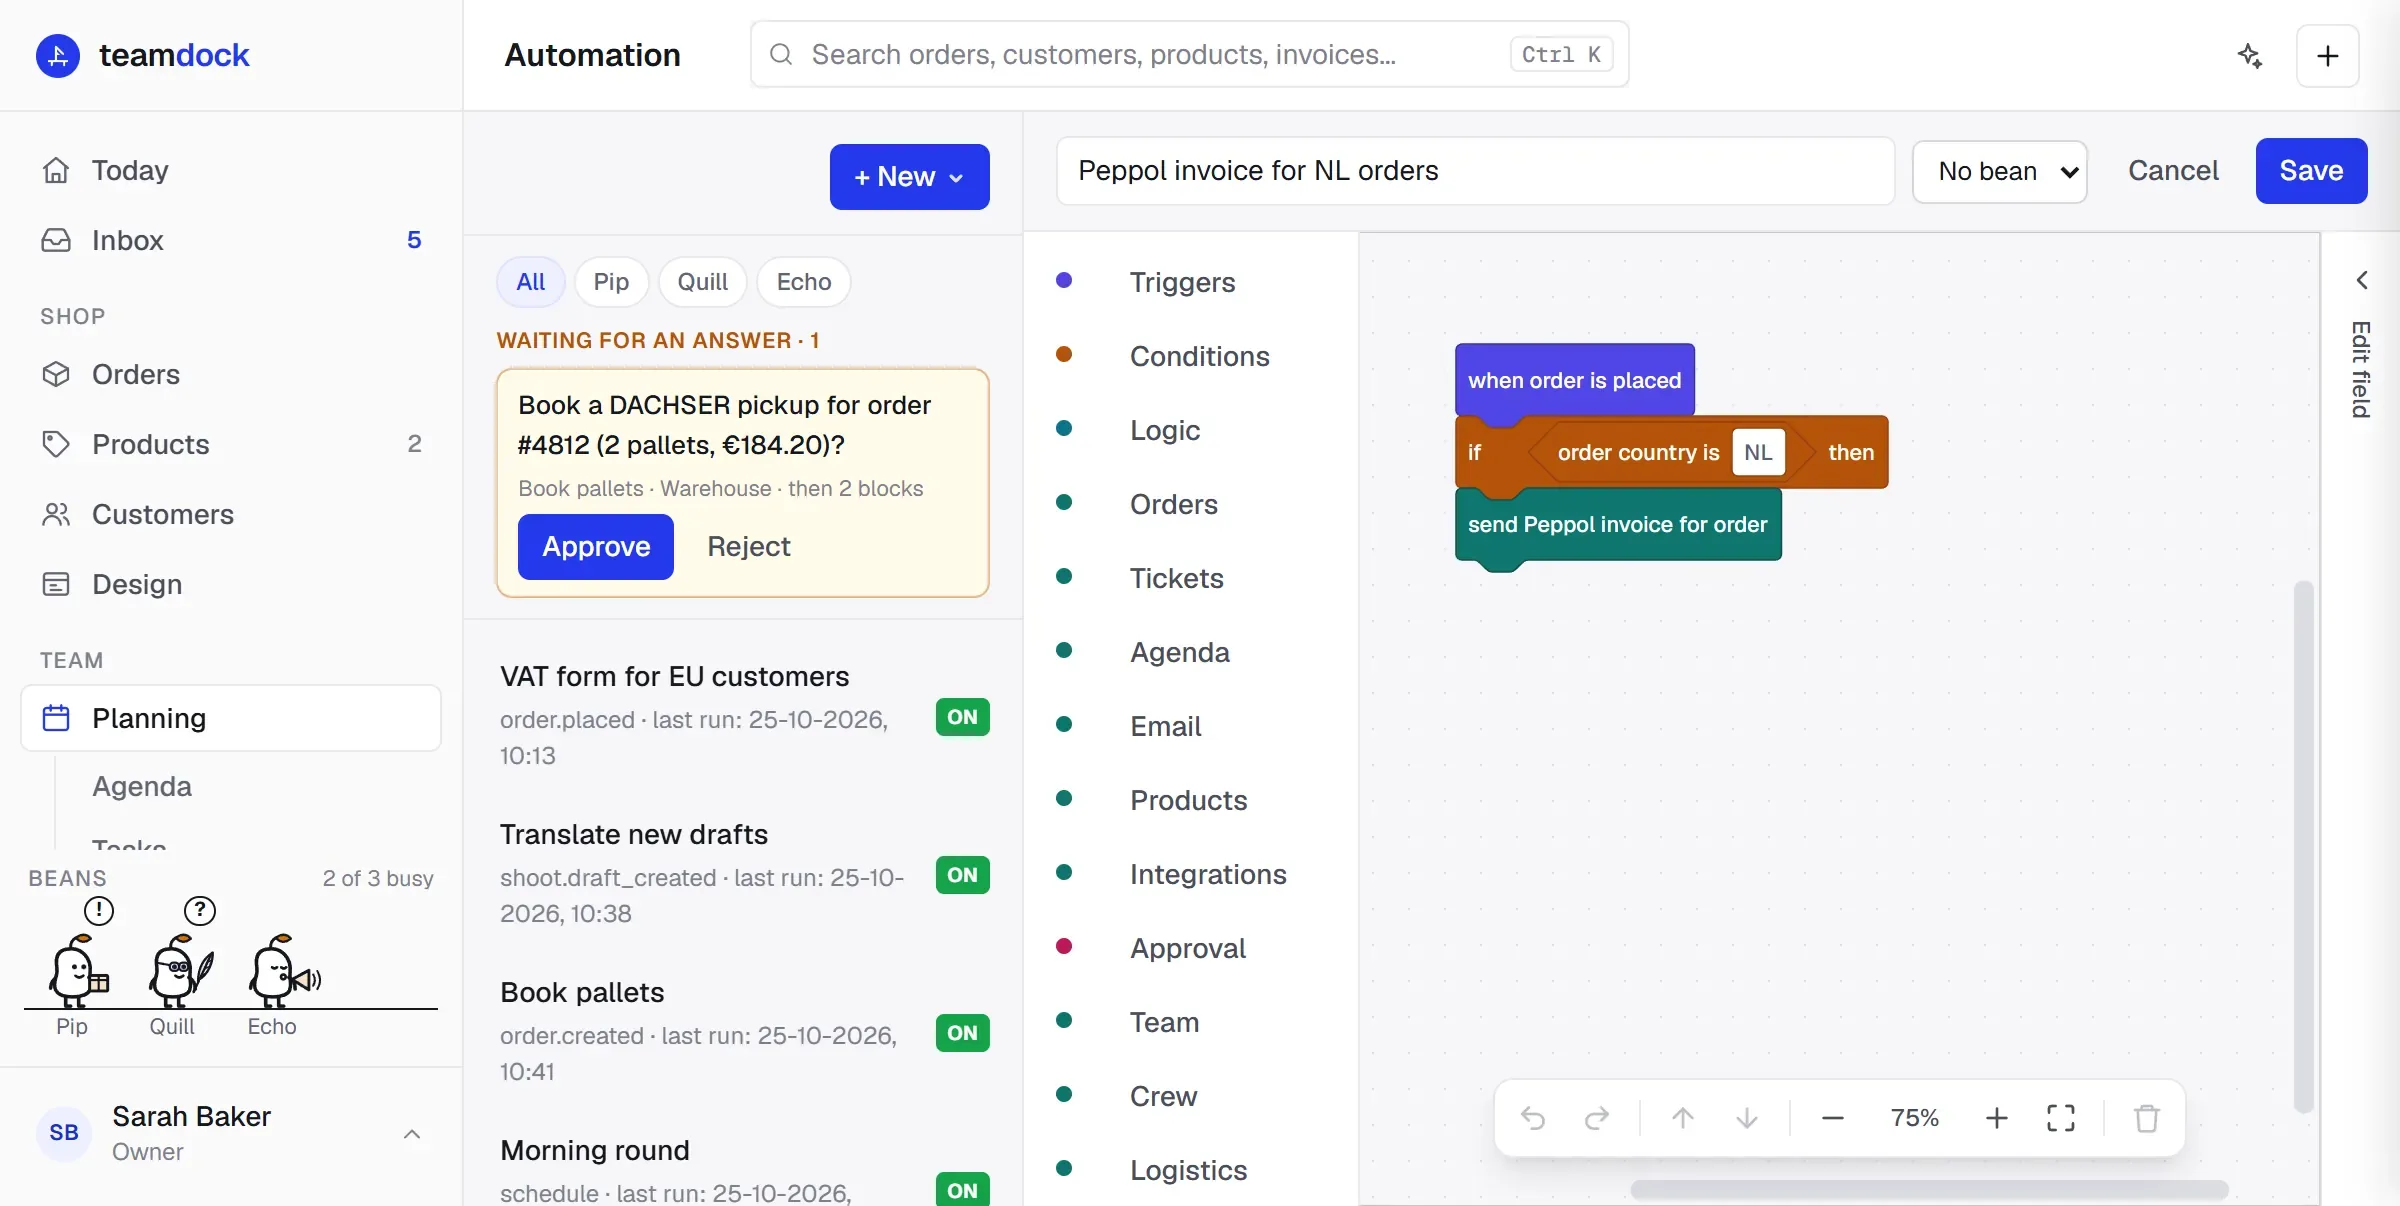
How an automation is put together
Section titled “How an automation is put together”Every automation starts with exactly one trigger and has the blocks that should happen underneath it.
| Kind of block | What it does | Examples |
|---|---|---|
| Triggers | When the automation starts. | An order is placed, updated or paid; a product is created; a ticket comes in; a studio draft is ready; a shipment gets a new status; on a schedule (e.g. every Monday at 09:00). |
| Conditions | Only carry on if something is true. | Order country, order total, order status, whether the customer is in another EU country, the ticket’s channel. |
| Logic | Choices and repetition. | If/else, or do something for each item. |
| Actions (Orders, Tickets, Agenda, Email, Products, Integrations, Team and more) | What happens. | Send a Peppol invoice, set the order status, generate a shipping label, create or reply to a ticket, add an agenda item, send an email or newsletter, translate a product, create a task, photos to Dropbox, a row in Airtable. |
| Approval | Ask for approval first. | “Book DACHSER for this order?” |
Creating an automation
Section titled “Creating an automation”Click + New. You can start in three ways.
From a template
Section titled “From a template”- Choose From a template.
- Pick a category, such as Tickets, Orders, Products, Scheduled, Photoshoot or Integrations.
- Click + Use template on the template you want.
- Adjust the blocks where needed and click Save.
Among the templates are a Peppol invoice for NL orders, an auto-reply to an urgent ticket, an agenda item for an order over €500, auto-closing tickets that have been waiting on the customer for more than 7 days, and a Morning round: every workday at 08:00 the bean tells the team in chat what is open.
Describe with AI
Section titled “Describe with AI”- Choose Describe with AI.
- Write in your own words what should happen, for example: “When an order over €500 comes in from the Netherlands, send a Peppol invoice and add a green agenda reminder for the team.”
- Click Generate draft. You see the Name, the Trigger, the conditions (Only if) and the actions (Then).
- If it is right, click Save (disabled). Otherwise go back with ← Back to change your description.
- Check the automation in the editor and then switch it on.
The draft is built from Teamdock’s existing actions. Nothing runs until you switch the automation on. Describe with AI is part of the Pro and Max plans and uses AI credits.
Building it yourself
Section titled “Building it yourself”- Choose Blank automation and give it a name.
- Drag a trigger from Triggers on the left onto the canvas. On a phone or tablet, tap + Block.
- Want a condition? Put an “if” block directly under the trigger and drag a condition into it.
- Put the actions underneath.
- Click a field in a block (— click to fill in —) to fill it in. The buttons in the field insert data, such as the order number or the customer. Preview shows the result with example data.
- Click Save.
Teamdock checks everything when you save. You get a message if there is no trigger, if blocks are not connected, if an “if” block is empty or not directly under the trigger, or if a “for each” block is empty.
Switching on, off and testing
Section titled “Switching on, off and testing”- In the list each automation shows ON or OFF. Click it to enable or disable it.
- ▶ Run now starts the automation once straight away. For an automation on studio drafts, it runs on the latest draft.
- Delete removes the automation.
Seeing what happened
Section titled “Seeing what happened”Under Recent runs you see when the automation ran, whether it worked, and the error if it went wrong. Click a run to colour the blocks by what they did: green ran, red failed, amber waits for an answer.
Asking for approval
Section titled “Asking for approval”With the block ask approval from … an automation waits for a colleague or a department, for example before a carrier is booked.
- Put the block where the automation should wait.
- Under The question, fill in what the person is shown. The buttons insert the order number or the customer.
- Choose who must approve it.
The question appears under Waiting for an answer at the top of Automation, on the Today page and in the Teamdock app. The person clicks Approve or Reject (optionally with a reason).
- Approved: the blocks below run.
- Rejected, or no answer in 7 days: nothing more runs.
Who may do what
Section titled “Who may do what”What you may do with automations depends on your level on Automation in your role. See Members and roles. Automations that belong to a worker bean are also managed through that bean. See Worker beans.
Troubleshooting
Section titled “Troubleshooting”“There is no draft product yet to run this on”. You are testing an automation on studio drafts, but there is no draft yet. Create one in the studio first.
A Dropbox or Airtable block does nothing. First connect your account under Settings → Integrations. See Dropbox and Airtable.